- Average speed on a race course
is not an arithmetic mean of partial speeds over individual sections
How simple intuition can fool us, let’s quickly solve the elementary task: “The cyclist ascends up a 10 km mountain for 1 hour, i.e. at an average speed of 10 km/h. There, he turns back and descends to the starting point for 0.5 hour, which gives him an average speed of 20 km/h. What is his average speed on the entire route?” Most of us will quickly provide as a solution the value 15 km/h, derived from the arithmetic average of partial speeds (10 km/h + 20 km/h) / 2 = 15 km/h. However, the cyclist rode a total of 20 km in 1.5 hours, thus he reached an average speed of 13.3(3) km/h.
1.1. The task at hand Competing athletes – cyclists, car racing drivers, skiers – they all ride along the course of approximately equal length. The speeds that they achieve on the individual sections of the course are varying. Among the above-mentioned competitions, likely the cyclists experience the greatest speed differences. They often ascend uphill at speeds below 15 km/h, and descend at speeds sometimes exceeding 80 km/h. Let’s calculate their average speed (Vs) along the entire route, when, the partial speeds of individual sections are equal – V1, V2, …, Vn, respectively.
1.2. Theoretical solution Let’s quickly derive the formula to encourage analysis of the surrounding reality, which often does not require a complicated thinking. We know that the length of the course equals to the average speed (Vs) multiplied by the time of the journey (T). It also equals to the sum of the partial sections on which the athlete achieves the speed Vi, passing them at time t. Mathematically we can write this as: Vs * T = V1 * t1 + V2 * t2 + … + Vn * tn Hence Vs = V1 * t1 / T + V2 * t2 / T + … + Vn * tn / T It can be noted that the overall average speed is influenced by the partial speeds, and their individual contributions are determined by ratio of partial sections travel times over the entire travel time.
1.3. Conclusions So in which part of the race course is the easiest to gain an advantage over other racers? The answer is that where racers go slowly, because traveling this section takes them relatively a lot of time. If we can significantly accelerate there, our average speed will increase notably, and the travel time may be remarkably shorter. We can clearly see this in cycling races – the Tour de France is won on long climbs of the mountain stages. How do we apply this conclusion to the ski race course? When preparing for the run, we have to particularly analyze those parts of the course where the speed is, or may be, low. Certainly the key sections will be: the start, the wider offset gates on steep sections, and the arrhythmic sections. We can definitely lose a good position when we enter the flat part of the course at too low speed. Then the travel time of such a section will definitely be significantly longer. Of course, racers often ski slower the difficult course sections. The time differences between individual racers at these sections are determined by skiers’ technical skills. Better trained skiers have the option to ski faster – and we have to coach them so they will ski aggressively using their skills toolset combined with well managed risk. Only then, they will prove themselves clearly, they can discover the capabilities not demonstrated yet and eventually beat the race opponents.
1.4. Reexamining the example In the above discussion I wanted to highlight analysis of every element in search of improving our performance in competitive racing. Breaking and focusing the analysis into a specific and distinguished subject will make it easier, and the use of simple analytical methods can lead us a little further than just a general, high-level view. Thus I suggest trying to examine elements that we naturally observe looking at skiers, e.g. where and how high to keep the inner hand of the turn; whether and when you can lift the inner ski; where can and where should not be the racer’s outer hand, etc.
2. Gravitation path analysis
Gravity is the strongest force that gives skiers speed. This is what accelerates the skier, but it is also the reason of difficulties in the slalom course and pulls him “down” when he needs to pass through the gates properly. During the turn, the force of gravity, always directed down the slope and towards the snow, has a component vector superimposed on the centripetal force, always directed towards the center of the turn. Let’s assume that a racer’s carving ski is loaded all the time and cuts a turn with a relatively constant, long enough radius. The slope is plane nad not steep. For the purposes of analysis, let’s divide this turn into 2 phases. The first – from the beginning of the turn to the slope fall line, the second from the fall line to the end of the turn. In the first phase, the pressure force on the ski, working perpendicularly to it, has its component, which supports the accelerating skier gravity and accelerates him even more. In the second phase, the same component works in the opposite direction and weakens the gravity force pulling the racer down the slope.
Let’s show it in the picture:
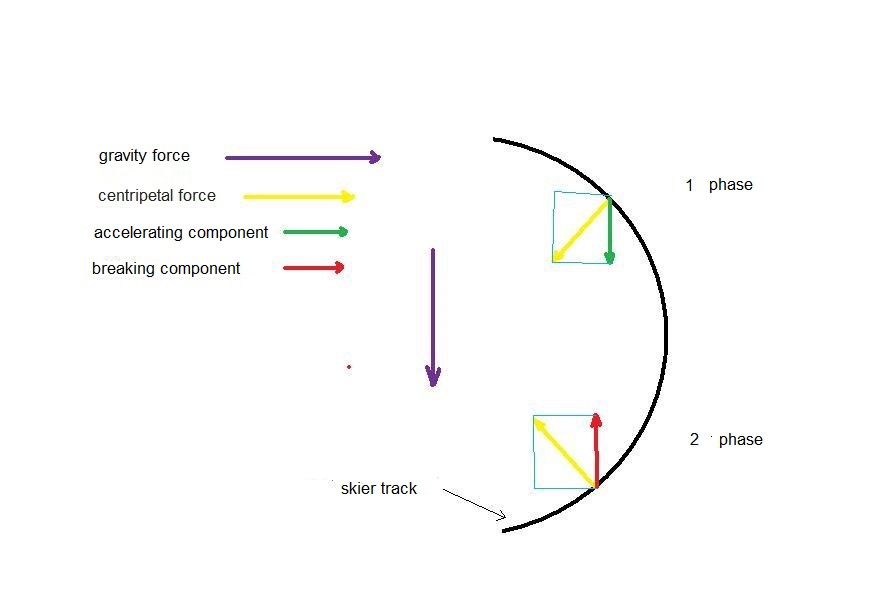
To go faster than others, the rider must support the “pull down” force. In the upper part of the turn he must develop as much pressure on the skis as possible. In the lower part he must minimize this pressure. This is the highest competitive skills.
How can we observe and evaluate it “live”? When pressed, even curved skis slip slightly, throwing some snow or ice aside. When the pressure is high, snow and ice gush out from under the skis and this can be seen clearly on the camera or TV screen. When a racer’s skis reject snow in the first phase of turning – it can be seen that he can accelerate. When too much snow appears in the second phase, you can see that he is braking. You do not have to wait for the result of time measurement, which will definitely confirm the observation.
It is a serious and difficult issue, how to initiate a strong pressure on the edges of the skis when starting the turn. I can’t provide only one solution here. Carving skis have enabled this method of acceleration, and the best competitors are looking for its optimization. Certainly with this search it is excluded to start the turn by going up, because it is in the first phase of the turn that you need to load the skis instead of unloading them. According to my observations, this load is currently made possible by starting the turn of the torso early enough, which is thrown into the new turn “down”, while the skis continue the previous turn. This prepares the base and the possibility of the earliest possible pressure on the new inner edges.
Minimizing the pressure on skis is a key problem in implementing the second turn phase. It seems to me that depending on the situation and driving technique, this can be done in two ways. The first, classic one, is performed by pulling the knees and feet up. If we ski as softly as possible, then of course, their pressure on the snow is small. This is a universal, the most commonly used method, which definitely must be used in short and fast turns. The second way to finish a turn can be a technique possible in longer turns. After aggressive and dynamic edging and pressure in the 1st half of the turn, we allow the ski to straighten in the turn second phase, recovering energy from it. This straightening ski, from which we released the aggressive pressure, can additionally “kick” the skier in the lateral direction while leaving the turn.
3. Ski bending
under the influence of centripetal force the skis bend in an arc
During the turn centrifugal force acts on the skier. To balance it, the skier puts the ski on the sharp edge, which cuts into snow and ice. The centripetal force that balances the resulting centrifugal one, flows from there. The skis put in a turn, bend in an arc. Cutting into snow and ice, the ski curve marks the course. Tensioning the firing arc from which arrows are fired is the storage of energy in it, which is released when the tensile force stops working. Then, the accumulated energy is transmitted to the arrow. Referring this mechanism to a ski moving in a bend and curving, we can see that our ski-bow is bent by centripetal force. It is always generated when the skier moves on a curved track. A bent ski, like the archer’s bow, stores energy. It is a matter of the skier-competitor that the release of this energy accelerates and does not stop the ride. Let’s consider which forces bending the ski can inhibit, which will accelerate it, and which will be neutral for its movement and speed.
3.1. The skier loads the ski evenly
The pressure, and hence the reaction of the ground, is spread over the entire ski. The center of the ski is loaded the most heavily. The tip and tale are loaded symmetrically. The forces of this pressure are shown in the figure by blue vectors. Let’s create a system of components of each of these vectors in which one of them works in the direction of travel (red and green vectors). This component will accelerate or brake the skier. We notice that the components of the pressure of forces acting on the tip of the ski slow, and the components of the forces acting on the tale of the ski accelerate. The pressure inside the ski has neither braking nor accelerating components. The symmetrical load of the ski causes the braking components (red vector) to balance with the accelerating components (green vector).
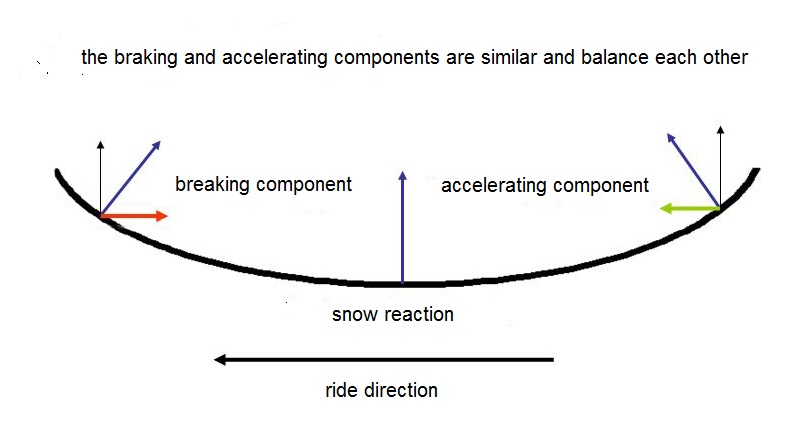
It can be seen that with such a symmetrical and balanced load, the skier experiences neither additional acceleration nor braking. Such a load is neutral for him.
3.2. The skier in turn “hangs on the tips”
When the skier is leaning forward and presses hard on the tongues of the ski boots, the front of the skis are heavily loaded. The rear part of the ski (tale) is not loaded, so the ground (snow and ice) does not give it a reaction and does not bend it. This part of the ski does not go along the track cut over the edge. The figure 2. shows the pressure components acting in the line (direction) of travel. The pressure on the bent part of the ski has no such component (middle and rear part). Pressure on the tops generates a braking component. This way of pressing and bending the ski brakes.
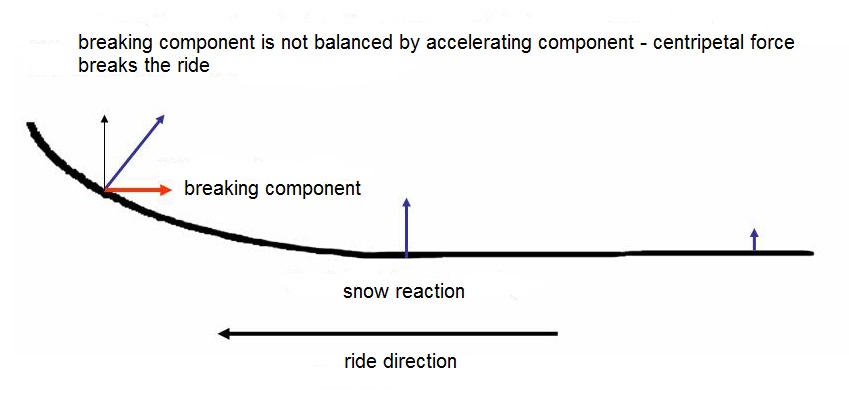
If the pressure on the ski is not as shifted forward as the drawing suggests and the tale of the ski is slightly bent, the braking component on the tip balances the corresponding accelerating component from the rear of the ski. It is important that with a greater than neutral load on the tips, the sum of the braking components is greater than the sum of the accelerating components, so the ski is subjected to braking.
3.3. The skier turns and bends the ski tales
The ski tips are unloaded and all the pressure is shifted to the rear. The legs, and in particular the thighs of the skier, are extremely tense, focused on maintaining this very unstable balance. Any additional overload may result in its loss. A slight deepening of this system and accidental even greater deviation may cause a fall on the back, especially when the competitor is riding short slalom skis. However, this situation has a great advantage – the bent back of the ski generates an accelerating component (green vector). An unloaded tip does not cause braking components, while the bent tail of the ski generates accelerating components.
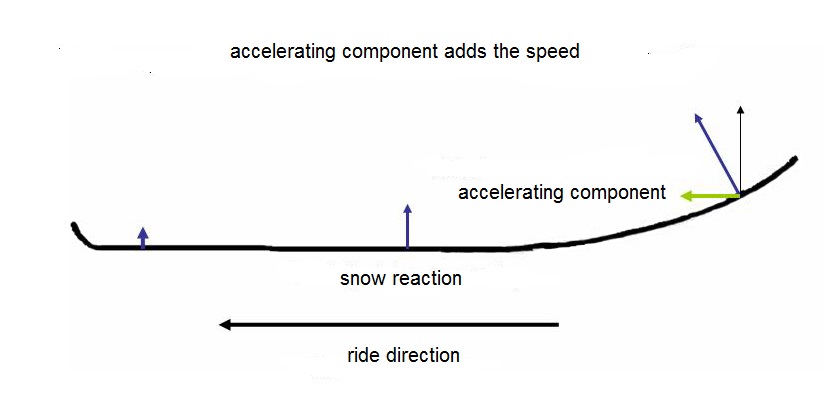
As in the previously described model of skis bent from the tip, with less decisive loading on the back of the ski, the advantage of accelerating phenomena occurs when the back is bent more than the ski tip.
3.4. When the skier knows that he is putting more weight on the tip or back of the ski
An indicator here may be pressing on the tongues or uppers of ski boots. Going “on the tips” requires less strength, but riding “on the back” is a huge load, especially on the thigh muscles. Therefore, sometimes naturally, the silhouette of a less trained or tired skier tilts forward, and shins put pressure on the tongues of shoes. Certainly, a balanced silhouette, in which the ski is loaded inside, is the most stable, natural, and at the same time it saves strength. Let’s not forget that the main element that gives the skier speed is the force of gravity and it essentially determines his ride time. This also causes the greatest overloads and difficulties, which skier must respond to, and must spend the most energy on “fighting” with it. The phenomenon we are currently analyzing, the influence of forces originating from the centripetal force, is only the “younger brother” of skier main drive. The others, more advanced ways to test your ski load are video and photo analysis. Let’s watch the bending of the ski, but first of all we look at the amount of ice and snow dust gushing from under the edge. Higher load, as well as the steepness of the slope cause that the heavily edged ski, despite its flexibility and damping properties, vibrates and at least slightly slides. It ejects snow and ice dust from underneath, which during analysis can be clearly seen on the TV screen or computer.
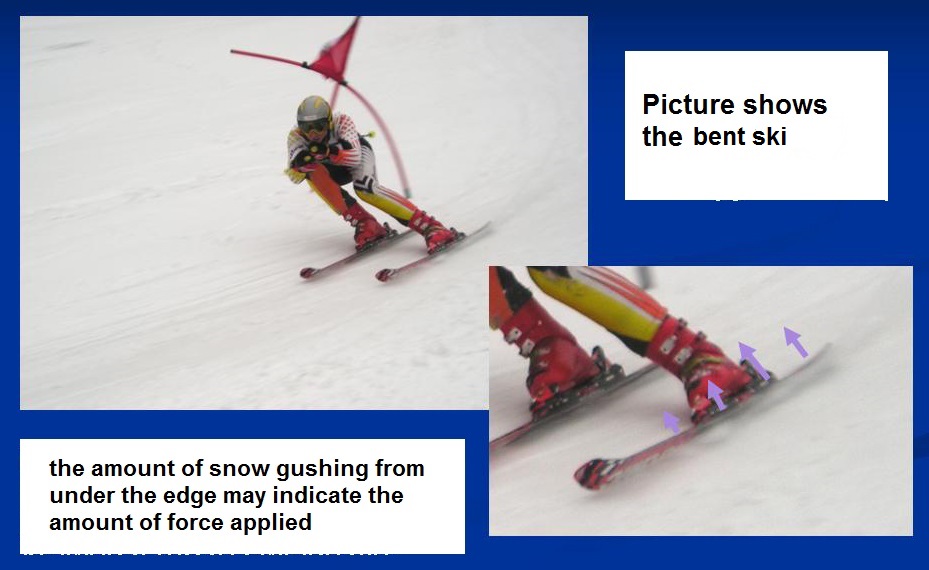
Another way to develop a skier balance is to ride on very short skis, not much longer than a ski boot, called a “snow blade”. Because they are so short, they do not tolerate any front-back deviations, simply threatening to fall backwards or onto the nose.
4. Inclination
various ways of implementation
4.1. What is the inclination?
The skier, like a cyclist in the turn, leans in the middle of the turn to resist centrifugal force. The greater this force is, the greater the inclination of the cyclist and skier is needed. A drawing showing this relationship would certainly be useful here. It would also be useful to recall the formula for the amount of centrifugal force, showing how it depends on the turning radius, linear speed, as well as the weight of the athlete. We should also presume a fairly natural assumption that the skier, like a cyclist, accurately cuts the turn and does not slip (or slips a little), it means, he receives a reaction force from the ground that opposes the centrifugal force generated by the turn. For us it is interesting how to transfer this inclination to faster riding.
In the advanced skier movement, his skis move on a different track and his torso and head travel on a different track. In a turn, the skis first set off to the side, then return under the torso and drive away again, but the other way round. One then talks about ski side sending, and the resulting leaning opposes the emerging centrifugal force of the turn being made. If we look at the track of a moving skier from above, we can see that his center of mass, due to the inclination, moves along a different path than his skis are going. Ski regulations require that a skier must pass through the gate space with both skis and feet – but the torso can slip over the pole. The decisive factor for the speed of the ride is the skier’s center of gravity passage on the shortest route possible. In other words, if the skier’s skis and feet go to pass the gates, then the center of gravity (head and torso) should move as straight as possible. Let’s look at an example when a competitor rides among slalom poles, skis and the center of gravity leave the tracks as shown:
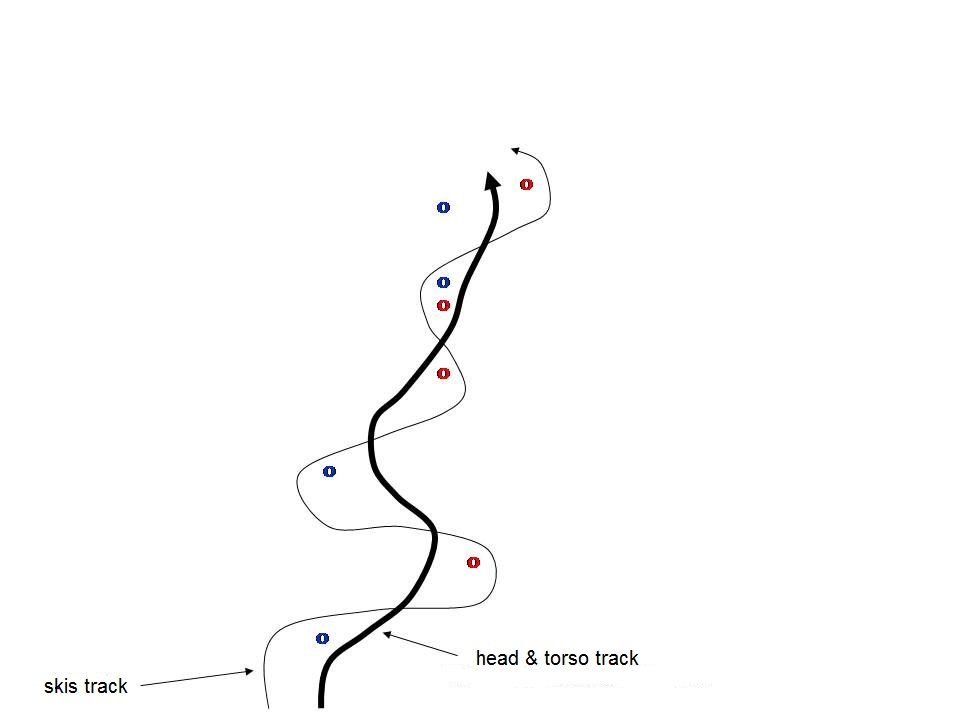
At the places of the maximum distance of both tracks (ski and foot track and the center of gravity track), the skier is leaning to the side as far as possible to the center of the turn. Where the tracks intersect, skis pass under the torso, there is no inclination.
4.2. What to do to make the route of the skier’s centre of gravity as straight as possible
It is necessary to mention elements – requirements that complement the main topic of this chapter, and which have a great influence on the “straightening” of the route.
a. Skis (feet) should ride close to the pole. Let’s make a small calculation: the slalom turning radius is about 15 meters. If we extend this radius by an unnecessary, too large distance between the ski and the pole, e.g. by 45 cm, then due to the linear relationship between the arc length and the radius, our route will be extended by (0.45 / 15) * 100% = 3% . The 3% is a loss of 1.5 seconds on a 50-second slalom!
b. Skis, in the slalom ride, should be led narrowly. When guiding the inner ski close to the pole and correctly distributing the load on both skis, it should be possible to extend the center of gravity as far as possible to the side beyond the pole, i.e. to the center of the slalom.
c. The inner ski that passes the pole the closest should go as far as possible aside. Of course, it should ride away enough not to disturb the correct proportions of loading the outer and inner skis and not to cause a fall. It is worth to work on “every centimeter”. You have to consider the great danger that the inner ski will pass the pole at the wrong side or get into it. Maybe the ski tip should be modified in such a way that after accidental hitting the pole it slips in the right direction?
d. Legs (skis) in individual turns should be “passed” aside as far as possible. This results leaning the knees down in the direction of the snow and putting the skis on the edges. Then the skis are turning, the body of the skier leans to balance the centrifugal force.
e. This is the inclination model mentioned above. The greater the leaning (inclination) is, the skier’s center of gravity goes over the “more straight” track (see the picture above). The size of the centrifugal force, and hence the degree of inclination, is expressed by the formula F = (m * v 2) / r known from high school, which says that the speed of movement (in a square) has the great influence. The turning radius have a decisive influence on the amount of deflection. The parameter on which the skier has an active influence is the possible shortening of the turning radius. For safer ride is an arc with a longer radius. Looking for speed, skier can go a little more towards the pole and try to make a short turn “in place”. The limit here is the construction radius of the skis. Beyond this is the way of shortening the radius is only by the slide or rotating skis in the air. The second limitation is the great centrifugal force generated by the turn with a small radius. The skier and his skis must withstand this strength on his feet and ski edges. It’s a huge effort. Faster slaloms are set for advanced powerful riders. Faster slalom generates the greater force (in a square) on the skier. This verifies his plans and capabilities.
f. When riding between slalom poles, skis and boots are pushed aside, the competitor makes pendulum movements. Either it is made only by the legs, when the torso of the skier stays “vertically” and the axis of rotation of this pendulum is in the hips, or, with longer turns, the athlete puts his whole body, while maintaining the position that allows effective ski edging. In the second case, the axis of rotation of our hypothetical pendulum is above his head. Let’s look at the pictures:

Two ways of the inclination – with and without bending in the hips
Let’s assess the pros and cons of both ways of riding.
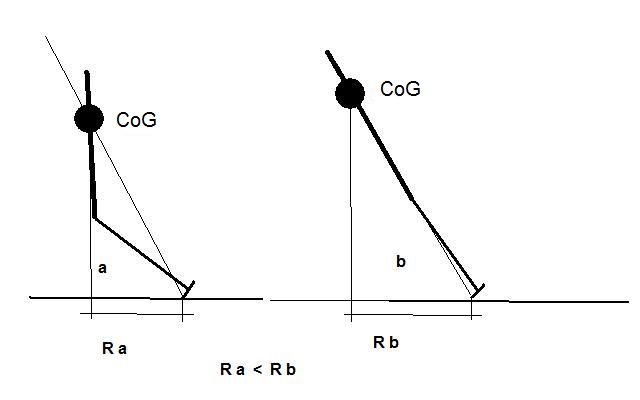
The inclination, i.e. the angle between the center of gravity, the fulcrum and the ground, is similar in both cases. This indicates similar parameters of speed, turning radius, and centrifugal force. The positions, however, differ from each other in the distance between the edge of the ski and the projection with the center of gravity (Ra, b). If the skier does not “break” in his hips, but only leans to the side, his center of gravity (CoG) moves away less from the axis of the slalom. Hence, his center of gravity track is shorter, so the racer has the opportunity to pass the slalom faster.
In addition, as can also be seen in the figure, the angle of the shin a) is smaller than the angle b). Hence, with a similar mechanical arrangement, the edging of the inclined skier is smaller than that of the “broken” in the hips skier. Less edging – less ski cutting into the snow, and hence less braking. This is another advantage of swinging leaning.
g. “Supporting” with your inner hand, or rather sliding the guard of the inner stick on the slope, is a common view in slalom turns. It can help to make the largest possible leaning and stabilize it with confidence.
4.3. Can we always use the technique of leaning the entire torso?
a. From school physics, we remember that a pendulum with a longer arm has a lower frequency of fluctuations. So, leaning the whole figure can only be made for longer turns, when the time to make a turn is longer. In hairpins, flushes and gate sets with quick turns only legs must work. Then it is needed a pendulum system with a higher frequency, i.e. with a shorter arm. The skier senses this intuitively and when the turn lasts less than 0.5 seconds throws only skis and feet sideways.
b. Positioning the skis very strongly on the edge (knees to the side), supported by an aggressive way of sharpening the skis, allows you to get the right “bite” the edges of the snow. Then the “bending” in the hips is a necessary mechanism, resulting from centrifugal force, determining the appropriate inclination of the center of gravity with maximum curved skis.
5. Anticipation
synchronizing the movement of the legs and torso
Anticipation is an old and well-proven way to implement a ski turn. It is another, different in time, turn of the skier’s head and torso, as opposed to the turn made by legs and skis. This non-simultaneity gives significant possibilities to perform some compensation of stress and instability at the moment chosen by the skier , i.e. when it is the most favorable for his turning technique.
The classic way is to anticipate the torso in relation to the skis. The turn is first initiated by the head and torso, while the skis continue the previous turn. It causes a sort of running-out of the compact head-torso system with the leg-ski system. The skier, as far as his skills, allows as much as he can, in the second phase of turning both these systems bring together dynamically. The “stretching” mechanism gives the skier an advantage at the moment of “pulling”, in which bringing the two systems together gives the opportunity to relieve the edge (less pressure on the snow). This way of overtaking has another very important advantage. It gives the possibility to start turning in such a way that it can push back (hit the edges) still in the upper part of the turn / see chapter – Gravitational analysis of the driving path /. There is also another advantage of classic overtaking – the head-torso system is the basic carrier of mass, and thus the inertia of the skier. Pointing him in the right direction at the beginning of the turn gives the skier more control over the situation.
The second, much more atypical and unusual way of realizing the independent movement of the head-torso and leg-ski systems is the ride of the American skier Bode Miller. He starts turning with skis and legs to catch up with his torso in the second phase. “Pulling” the front-leg ski system with the head-torso system temporarily remaining behind, also gives great opportunities for unloading the skis in the 2nd phase, but implemented as if from the other side. Both techniques lead to the same balanced position between turns. Ron LeMaster showed it very well in the famous photo in the article – “Bode’s Big Secret” published in SKI Magazine (3-4 / 2003). The photo shows the turn of Bode Miller and Kjetil Andre Aamodt between the same gates. In positions 1 and 8, both competitors ride (look) almost identical, but in between, they make a turn with a significantly different technique.
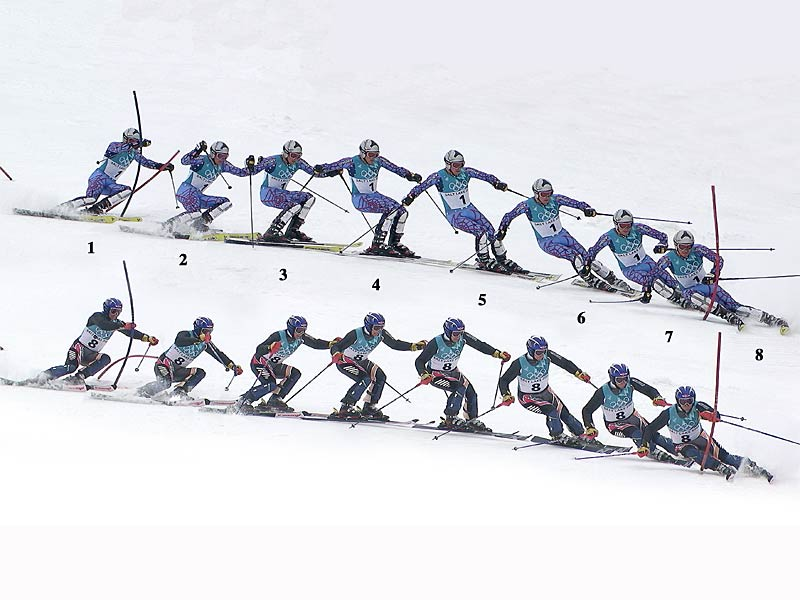
Classic anticipation (K. A. Aamodt) allows you to control a rapidly changing situation. The head follows the path, which together with the arms first directs (throws) towards the new turn. Skis start the turn a moment later.
Deviation (B. Miller) is an aggressive and very risky way of riding, because returning to a balanced position can be difficult. Characteristic for this style is the edging at the end of the turn so that the skis get caught on the snow and “wait” for the torso. Huge agility and strength of thigh and abdominal muscles are also necessary.
6. Hitting poles
what to do to make them stop as little as possible
How to hit a slalom pole to lose the least speed! The racer, looking for the fastest possible track, gets very close to the poles marking the slalom route. One of the attributes of competitive riding is hitting these poles so that only skis and feet cross the gate. The “rest” of the racer goes over the pole, placing it forward or pushing it aside. Each pole strike stops. How much inhibits – let’s try to estimate. We don’t need calculations with too much accuracy. It’s about letting us know what order of magnitude they are and how much they affect the braking of the riders depending on their height and weight. Let’s describe the simplified model shown in Fig. 10.
The impacted pole receives energy of movement and overcoming the resistance of the hinge, receiving it from the skier.
A skier with a certain weight (including clothing and equipment) gets to a standing pole at a speed of 36 km / h, i.e. 10 m / s. The pole stands upright, is regular in thickness and protrudes above the snow for 1.8 m. The skier touches the pole with a piece of clothing (equipment) and gives it its speed at the point of touch, i.e. vs 10 m / s. The pole touch point receives the skier speed. It can be either at the height of the hand (when the skier hits the hand) or at the height of the knee-boot (when the skier hits by the protector or lower). A moment later, the point of impact slides over the pole and no longer transmits its energy. The pole rotates around the point of insertion at a speed at which the point of impact has a linear speed of 10 m / s. For ease of calculation, we assume that the pole is stiff and does not bend as the pictures actually show. We assume that it is a homogeneous rigid body with a pivot point at the base (in a hinge at snow level). This assumption seems legitimate, because we are not looking at the entire mechanics of pole movement, but only an estimation of the amount of energy that the pole can receive from a skier. By touching the pole, the skier not only turns it around it’s position, but also overcomes the resistance of the swivel. This joint must be strong enough to lift the pole back to vertical position after passing the skier, i.e. give it the potential output energy. The amount of this energy is at least the pole’s potential energy, i.e. the product of the pole’s mass, its average height and acceleration due to gravity.
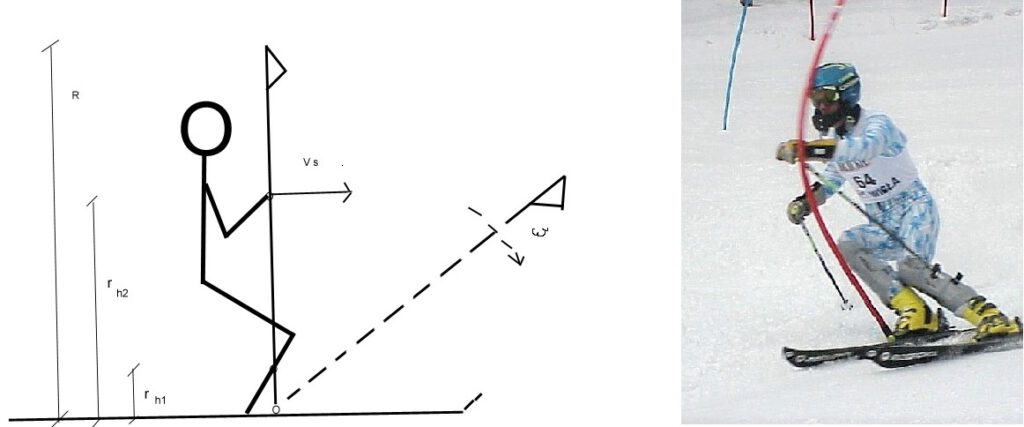
Designations and general assumptions:
Vs – skier speed (let’s assume 10 m / s, i.e. 36 km / h)
Ms – skier mass
Mp – mass of the moving part of the pole (let’s assume 0.4 kg)
Rh1 – the height of the impact with a shoe or protector (let’s assume 0.3 m)
Rh2 – hand hit height (let’s assume 1.2 m)
R – pole height (1.8 m)
ω – angular velocity of the pole lying down
What amounts of energy are transferred:
We calculate the energy of the skier after impact (Eks’) from the general equation for the kinetic energy E = ½ M V2, from which we subtract the kinetic energy of the laying (rigid) pole and the energy stored in the joint. Hence this energy can be expressed as:
Eks ’ = ½ Ms *Vs2 – 1/6 Mp* R2 (Vs / Rh) 2 – Mp* g* R / 2
kinetic energy of the skier kinetic energy of rotated pole energy accumulated in joint
We can also calculate the proportional loss of speed in %.
Calculations on the data for different skiers:
* Child weighing 25 kg has kinetic energy (E = ½ M V2) 1250 J
a) when he hits with his hand Rh = 1.0 [m] loses 25.6 J and 2.05% energy, i.e. 1.01% speed
b) when he hits with a knee-shoe Rh = 0.3 [m] loses 244 J and 19.52% energy, i.e. 10.27% speed
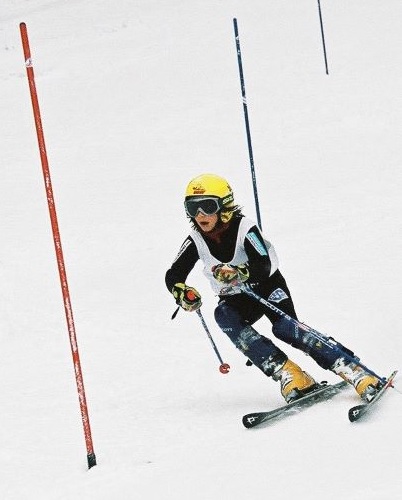
* Junior weighing 40 kg has kinetic energy (E = ½ M V2) 2000 J
a) when he hits with his hand Rh = 1.2 [m] it loses 19 J and 0.95% energy, i.e. 0.46% speed
b) when he hits with a knee-shoe Rh = 0.3 [m] loses 244J and 12.20% of energy, i.e. 6.29% of speed
* 58 kg woman has kinetic energy (E = ½ M V2) 2900 J
a) when he hits with his hand Rh = 1.2 [m] loses (19J) 0.66% energy, i.e. 0.32% speed
b) when he hits with a shoe Rh = 0.3 [m] loses (244J) 8.41% energy, i.e. 4.29% speed
* A man weighing 85 kg has kinetic energy (E = ½ M V2) 4250 J
a) when he hits with his hand Rh = 1.2 [m] loses (19J) 0.45% energy, i.e. 0.22% speed
b) when he hits with a shoe Rh = 0.3 [m] loses (244J) 5.74% energy, i.e. 2.91% speed
Conclusions:
1. Low pole (knee or boot) impact brakes repeatedly (up to 10 times) more than a high-impact pole.
2. Skiers with a lot of weight can sometimes afford to hit the pole lower because their percentage speed loss is rather small.
3. Lighter skiers (women and juniors) should try to hit the poles quite high.
4. Skiers with low weight (children) should not hit the poles at all – they should avoid them, or cover them with an internal hand, so as not to cause impact, but only to bend the pole to the side. In the calculations, the assumed speed was 10 m / s (36 km / h). For children’s riding, a lower speed should be adopted, which would further increase the importance of braking effects.
5. After braking by the striking pole, gravity again accelerates the skier. This acceleration depends on the slope. The skier recovers speed faster on a steep slope and slower on a flat. Hence the conclusion: You can afford a low impact when it is steep, but you should rather not hit on a flat slope.
Hitting a pole always inhibits – let’s minimize this effect!
7. Edge dynamics
Proper use of edges is one of the most important problems that a rider has to solve while skiing. Decisions must be made dynamically, bearing in mind the general principle that the milder the edgeing, the faster driving will be. I don’t want to be considering to what angle to sharpen the edges, although that’s definitely a necessary fix. I want to focus on the intensity (aggressiveness) of the edge in the different phases of the turn and on the decision whether always aggressive and strong edgeing will lead to braking. For the rider to drive faster than others, he must support the force pulling him “down”, that is, at the top of the turn as much as possible on the skis to press, and at the bottom minimize this pressure. These are the highest skills of the rider. How can we observe and rate them “live”? With pressure, even the edged skis slide slightly, throwing a little snow or ice aside. When the pressure is high, the snow and ice squirt from under the skis and can be clearly seen on the camera screen or TV. When the rider’s skis reject the snow in the first phase of the turn – you can see that he knows how to accelerate the turn when too much snow appears in the second phase you can see that it brakes. You do not have to wait for the result from the timing measurement, which will surely confirm our observation. It is a serious and difficult issue, how to provoke the strong with as much pressure as possible on the edges when starting the turn. I can’t give a single solution here. The carvng skis have enabled such a way of accelerating, and the best riders are looking for its optimization. Surely, with these searches, it is not possible to start the turn by going up, because it is in the first phase of turning that you need to reload the skis, rather than relieving them. According to my observations, this weighting is currently possible by starting the torso turn early enough, which is thrown into a new turn “down” while the skis continue to turn the previous one. This prepares the base and the possibility of the earliest pressure on the new inner edges. In achieving the second phase of the turn, minimizing the pressure on the skis is a key problem. It seems to me that depending on the situation and driving technique, you can implement this in two ways. First, classic one, by pulling up the knees and feet under the body. If we drive the skis as softly as possible, then of course their pressure on snow is small. This is the universal, most commonly used way, which certainly needs to be used in short and fast turns. The second way to finish the turn can be possible in longer, less tight turns. After aggressive and dynamic edge and pressure in the 1st turn phase, or halfway there, we allow ourselves to straighten the ski in the 2nd phase of the turn, recovering energy from it. This straightening ski, from which we released aggressive pressure, can additionally “kick” the skier in the side direction, ie. from the turn.
7.1. Aggressive early edging followed by “active passivity”
Let us refer to the gravitational analysis of the track described in chapter 2. Let’s assume that the skier is riding on a mildly steep slope with a fairly long turn, such that the skis ride on an arc along the entire length of the turn. The pressure on the ski and its strong edge in the upper part of the turn, i.e. before the fall line, gives a completely different effect than the edge in the part after the fall line. This is illustrated by vectors and their components shown in the figure. Aggressive pressure on skis and edges at the top of the turn will accelerate the skier. Strong pressure and edging at the bottom will be a braking factor. What to do, how to prepare a skier’s layout so that it can be pushed away from the snow at the top of the turn at all. What to do in the second phase of turning? How to minimize the increasing influence of the skier’s weight then, adding to the centrifugal force generated from riding in an arc? When we want to absorb the impact of our torso against the ground, e.g. when jumping, we simply do a deep squat during the jump. It seems that here we can apply this mechanism. The lower, closer to the snow we go down in the squat, the more we get the cushioning (reduction) of gravity. Of course, this “squat” has an appropriate system of hips, torso and arms to maintain both balance and strong ski edging. There are so many great photogenic examples of competitors passing past poles, especially giant ones. It is worth analyzing them and choosing the method of the best amortization combined with a strong, though not always maximum, edge bending system. A certain variant of this turn, although it is rarely used when there are conditions for it, i.e. not very deep and longer turns, stopping the descent in the knees and hips and wait until the straightening ski pushes us a little forward in the direction of our ride between gates. Conditions for such a turn appear rather rare, because the slalom setters more often “tighten” the turns than “untight”, more often imposing difficulties than encouraging acceleration. It seems to me, however, that it is worth to train yourself and this kind of twist to apply it in the right situationsometimes even subconsciously, gaining a few hundredths of a second over competitors.
7.2. Leg throwing
Certainly it is not a literary, or scientifically accepted phrase describing the phenomenon of flipping skis in the air to make them curved in the next turn. In a situation where a competitor feels that he will not turn on the edges, due to lack of space or steep slope, he simply throws skis in the air through the slope fall line, and prepares the position for maximum edging in a new turn. It seems that one of the important aspects of this turn is not to extend the time of this edging to start the next change of direction efficiently. This is a very unnatural and “physical” turn, which both competitors and theoreticians do not like, because it is not an element of sophisticated technique, but simply a very forceful and uncomplicated element.
7.3. Fluidity search
When discussing the dynamics, i.e. the forceful actions that are part of the ski turns, it must be said that when we are looking for a fast route, this “dynamics” should be as little as possible. Let’s seek consciously and subconsciously technical solutions that will minimize the effects of forces. The exception, however, are the accelerating forces of the skier, i.e. directed in the direction of his ride (or when their components are directed in this direction). The title “fluidity” of movement, which usually gives minimal braking, is associated with the economy of movement achieved during many repetitions, often performed under significant fatigue. The method of refining this fluidity is usually long-lasting training. However, the methodology of this training should be left to trainers who will adapt it to the rider’s abilities, while protecting him from injuries and other dangers.
8. Center of gravity movement
among slalom and giant gates in a plane perpendicular to the slope
During the club discussion on skiing technique, I was reminded of a certain interpretation of the known principle of striving for the smoothest possible movement of the skier’s center of gravity. Its mechanism is known to everyone, it is discussed in the basic courses of assistant trainers and ski instructor courses, it is present in many skiing manuals. The point is that the path along the center of gravity between points A and B should be as short as possible, which means that the travel speed is the fastest.
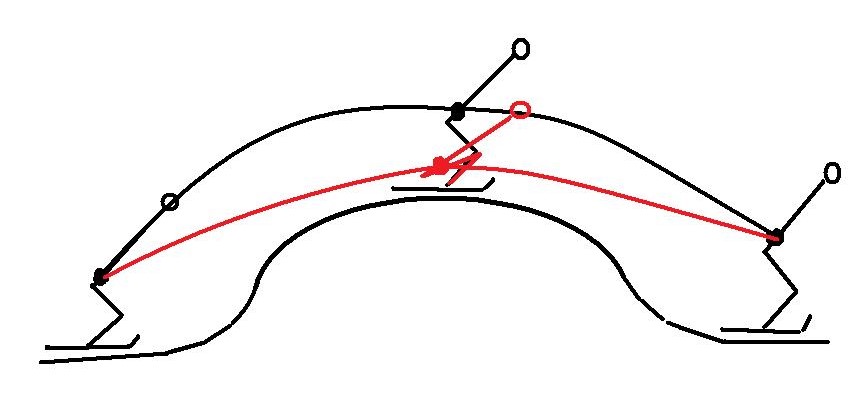
The figure shows how the skier should overcome the bump. If it absorbs its elevation by bending the legs and hips, its speed is significantly higher than that of a skier maintaining constant deflection. The difference is due to both the shorter distance that the center of gravity must travel, and less pressure on the skis, and thus less braking, when passing through the bump by a way of lowering the center of gravity. You can check this difference when two skiers ride side by side on a not too steep ski-track or artificial bumps track that you often find on the slopes. I recommend it as a good lesson for young riders.

Figure 12. shows the already presented model of the skier’s center of gravity in relation to skis and slalom poles being passed. Please note that this move is presented in a “top view”. Let’s observe the movement of the slalomist’s center of gravity from Figure 12. in a different plane. Let’s look at him as we saw the skier’s center of gravity in Figure 11, i.e. in the vertical plane. Let’s develop the slalomist center of gravity ribbon from Fig. 12. in our mind and observe the movement of this center of gravity in the “up – down” plane. It’s like riding parallel to a skier and constantly watching him. Let’s review some movies on the web when the camera goes behind or next to the player. Let’s look then, as his center of gravity moves “up – down”, or how, and whether the torso goes up or down. It turns out that the center of mass of a very good skier, located somewhere in the middle of his torso, does not essentially change his distance from the snow, i.e. he does not make “up – down” movements. Referring to the principle described at the beginning, i.e. the greatest possible smoothness of movement of the skier’s center of gravity, it would be necessary to eliminate the old-fashioned “going up” throwing the skier as the bump throws him up in Fig. 11. What to do with the center of gravity after maximum bending in the hips and “pulling up” the legs in the second part of the turn (near the pole)? How do you start a new turn that once started going up? This, of course, quite a long time ago some trainers teach and show in trainings – there is no way up, but throwing the torso “down” towards a new turn. The skis are still going sideways, but the torso (head) is already starting a new turn. This new arrangement creates a situation in which the torso, following a short path, catches up and chases the skis, giving the opportunity to start dynamic edging in the first phase of turning. Combined with the classic theory of bending legs and hips when passing through a bump, this observation becomes a total criticism of “going up”. This criticism in studies is rather unpopular. I think the reason is that it is much harder to start a new turn, believing that the carved skis will definitely turn when placed on the edge. It is easier to “unload up” by simply moving them underneath. Avoiding “going up” is not only avoiding the unnecessary impulse generating additional braking pressure on the edges. With this look you can see that “going up” is also an element of extending the center of gravity path, and thus extending its travel time, from point A to B.
9. Closed gates
Flush passed over from the side, Grange’s hairpin
The passage of closed gates in slalom is a struggle with very quickly consecutive poles. A competitor goes past them so fast that they often cannot, and even maintain the smoothness of the ride, should not react to them. I want to draw attention to 2 situations in which the slalom technique tries to make it independent of the mass inertia, to pass the closed gates with the least possible action.
9.1. Flush overrun from the side at a sufficiently high speed
Let’s start with the illustration:
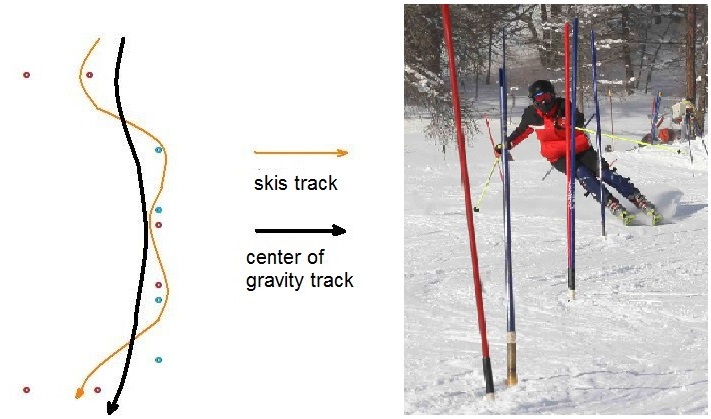
When a racer has to cross a 3 gate flush, usually set aside sideways from the main slalom line, the middle turn in the flush can be made only with the feet and knees so that only the skis pass through the gate. With sufficiently fast travel, the head and torso could remain on the side of the gates line. It requires a certain familiarity from the skier, and the key to implementing this plan seems to be, apart from speed, looking far ahead, “smoothing” the planned route. Needless to say, the smoother the center of gravity track is, the shorter its route and the faster the ride time. This sufficiently far-ahead looking is essential for the rider to take the right position in front of future situations or difficulties. After all, the passage of a closed gate takes only about 0.5 seconds, and in such a short period of time we are unlikely to be able to consciously react to the circumstances.
9.2. Grange’s hairpin
I don’t know what the hairpin crossing method is called in coaching and professional environment. I think it may not have its name, because it is a relatively “young” element of technique, which I observed for the first time in the French slalom master Jean Baptiste Grange ride. As you know, passing the hairpin is very short. At a speed of 40 km/h or 11 m / s, the passing time of a 6-meter closed gate is 0.5 s. Competitors usually pass this system without changing the pole’s hand. They hold the shielding hand until they pass the other pole of the hairpin. Hence the attack of the first pole is by the cross block hand and the second pole by the inner hand. Difficult slalom settings very often force very tight exit from the hairpin gate to fit into the next turn. A great simplification in this situation would be the possibility of attacking the final goal with the crossblock hand, because then it is easier for the competitor to pass the skis close to the pole, and the torso and head have greater freedom of movement. So Grange used a technique in which the first pole of the hairpin is attacked with the inner hand to hold it at the away pole as the cross block hand. It seemed to me that this is a very difficult technique and indeed not all of the world’s top riders use it. It requires planning. To my big surprise, I noticed that young skiers at the regional club level are quite good at it, starting the hairpin system from the trip “on hand” inside. Perhaps the key here is looking far ahead and getting ready for a difficult exit from a short closed gate.